Design Division 所属アプリエンジニアのスージです。 良いデザインでクライアントのビジネスを前進させるために開発している、Jetpack Compose と KMM が好きなエンジニアです。
movableContentOf のような、Jetpack Compose の 1.2.0バージョン の追加されたAPI のまとめ記事も書いたので、ぜひ読んでみてください。
そして、1.3.0で来る LookAheadLayout APIで Compose の実現可能性がもっと広がると思います!この記事は 1.0.0 から存在してる SubcomposeLayout について解釈をまとめて書きます。
Composition・Subcomposition・Recomposition
SubcomposeLayout の説明に入る前に Compose runtime のいくつかのコンセプトについて軽く説明しようと思います。
Composition とコンポジション
@Composable 関数が発行するオブジェクトを Composition というツリーに追加します。
UIの観点で言うと@Composable UI 関数が発行する LayoutNode のツリーは Composition です。
Activity の中の setContents を呼び出すと新しい Composition が作成され、この初回作成されることをコンポジションする(to compose・組み立てる)と言います。
作成された Composition は他の Activity の Compositionと関係がないので Activity ごとの独立存在で、root Composition と定義されてます。
class SampleActivity: Activity {
    override onCreate(..) {
        setContent {
            MaterialTheme {
                ..
            }
        }
    }
}
Subcomposition とは
Composition は独立で存在することもできますし、親 Composition や子 Composition を持って Composition のツリーのように存在することもできます。
Root Composition 以外もツリーの深い段階に新しい @Composable ツリーを作成することができ、親の root Composition と連携されるこの子 Composition をSubcomposition と言います。
- Subcomposition は親 Composition と依存せず自分の初回コンポジションのタイミングを自分で決めます。
- Subcompositionの Recomposition も親 Composition や兄弟のコンポジションと依存しない。
Recompositionとは
State が更新され、Composition のある部分を更新するためにその部分の @Composable 関数の再呼び出して再作成される。この再作成されることを Recomposition する(再コンポジションする)と言います。
SubcomposeLayout とは?
SubcomposeLayout の Documentation によると、以下のように書かれています。
Analogue of [Layout] which allows to subcompose the actual content during the measuring stage
for example to use the values calculated during the measurement as params for the composition
of the children.
SubcomposeLayout の役割としてLayoutと同じ子たちのサイズと位置を調整することです。SubcomposeLayout は子ごとに新しい Subcomposition を組み立てることができます。まずは、ここに書いてある Layout について見てみましょう。
Layout
Deep dive into Jetpack Compose layouts で上手く説明されています。Jetpack Compose のUI作成は3つのステップで行います。

1. Composition : UIコンポーネントツリーの作成、つまり初回コンポジションや Recompositionが実行されます。
2. Layout : width・height の計算(measure)と位置(place)の調整を行います。
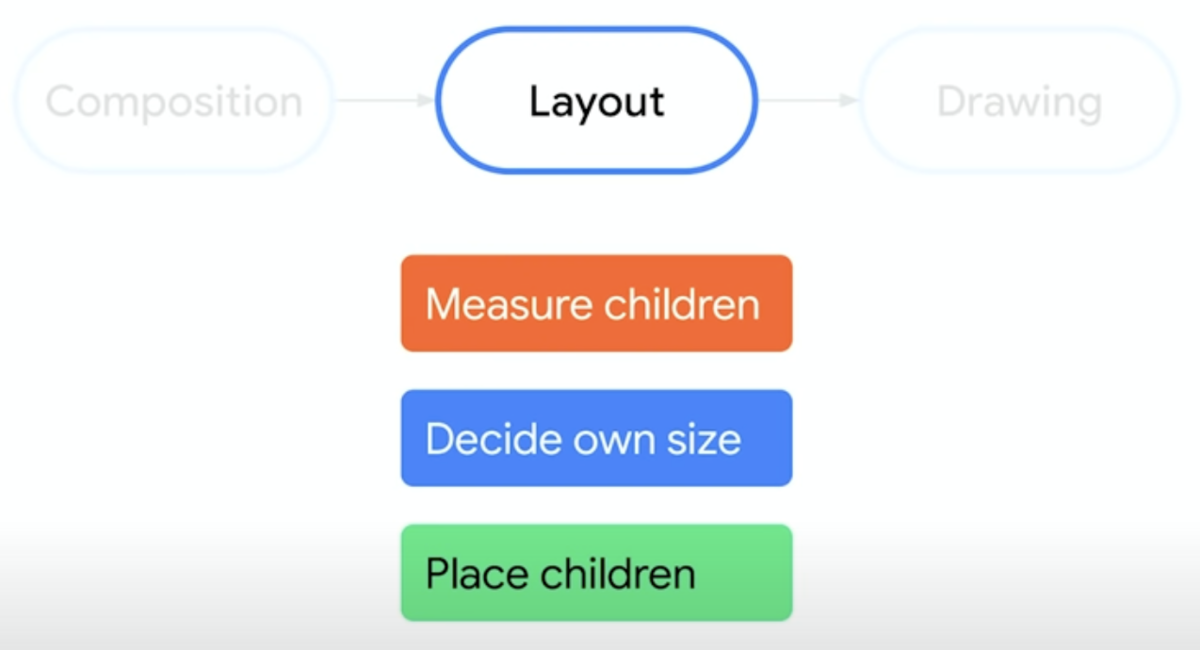
- 子たちの height・width 計算
- 自分の height・width 計算
- 子たちの位置を調整
3. Drawing: UIコンポーネントツリーをレンダリングします。
Composition を細かく調べると明確になっているのは、全ての @Composable UI コンポーネントは 1つ以上の Layout で作られています。

UI作成の layout ステップは @Composable Layout の中で行われます。
fun MyLayout(
    modifier = Modifier,
    content: @Composable () -> Unit,
) {
    Layout(
        modifier = modifier,
        content = content, // children of MyLayout
    ) {
        // used to measure children with the available
        // constraints using Measurable.measure()
        measurables: List<Measurable>,

        // constraints of MyLayout's bounds
        constraints: Constraints ->
            ..
    }
}
つまりRoot Composition の初回コンポジションや Recomposition 後、関わってる全ての UIコンポーネントは順番に layout ステップが行われます。
SubcomposeLayout と Layout の違い
SubcomposeLayout はLayoutと同様で、子たちの layout ステップが行います。これは root Composition と共になくroot Composition の新しい Subcomposition を組み立ててそこで行われます。
SubcomposeMeasureScope.subcompose() を使って新しい Subcompositionを組み立てます。
@Composable
fun MySubcomposeLayout(
    content: @Composable () -> Unit,
) {
    SubcomposeLayout {
        // constraints obtained from Measure pass of parent Composition
        constraints ->

        // Subcomposition for content
        val measurables1 = subcompose(slotId = Unit) { content() }
    }
}
上述のとおり、Subcomposition は親 Composition に依存せず初回コンポジションのタイミングを自分で決めます。 SubcomposeLayout の場合も子たちの初期コンポジションは親の直後ではなく、親のコンポジションや Recomposition終わった後 layout ステップに行います。
SubcomposeLayoutSample の例を見て説明します。
@Composable
fun SubcomposeLayoutSample(
    mainContent: @Composable () -> Unit,
    dependentContent: @Composable (IntSize) -> Unit
) {
    // enum class SlotsEnum { Main, Dependent }
    SubcomposeLayout { constraints ->
        // [1]
        val mainPlaceables = subcompose(SlotsEnum.Main, mainContent).map {
            it.measure(constraints)
        }

        val maxSize = mainPlaceables.fold(IntSize.Zero) { currentMax, placeable ->
            IntSize(
                width = maxOf(currentMax.width, placeable.width),
                height = maxOf(currentMax.height, placeable.height)
            )
        }

        layout(maxSize.width, maxSize.height) {
            // [2]
            mainPlaceables.forEach { it.placeRelative(0, 0) }

            // [3]
            subcompose(SlotsEnum.Dependent) {
                dependentContent(maxSize)
            }.forEach {
                it.measure(constraints).placeRelative(0, 0)
            }
        }
    }
}
mainContentの新しい Subcomposition を組み立て layout ステップの Measure を行い、最大 width・height を計算します。mainContentの layout ステップの Place を行い、Layout ステップが完了します。mainContentの layout ステップが終わった後dependentContentのコンポジションと layout ステップを行います。
この例では mainContent の layout ステップが終わり、最大サイズを取得するまで dependentContent のコンポジションの延長ができてます。
実際に使われてる SubcomposeLayout の例
Compose UI の中で、実際に SubcomposeLayout が使われてるいくつかのコンポーネントの例を見ていきましょう。
BoxWithConstraints
BoxWithConstraints は SubcomposeLayout のシンプルな例です。
@Composable
@UiComposable
fun BoxWithConstraints(
    modifier: Modifier = Modifier,
    contentAlignment: Alignment = Alignment.TopStart,
    propagateMinConstraints: Boolean = false,
    content:
        @Composable @UiComposable BoxWithConstraintsScope.() -> Unit
) {
    val measurePolicy = rememberBoxMeasurePolicy(contentAlignment, propagateMinConstraints)
    SubcomposeLayout(modifier) { constraints ->
        val scope = BoxWithConstraintsScopeImpl(this, constraints)
        val measurables = subcompose(Unit) { scope.content() }
        with(measurePolicy) { measure(measurables, constraints) }
    }
}
Root Composition の Layout ステップの Measure で親UIコンポーネントの constraints をそのまま子のcontentに渡し、content の Layout ステップを行います。
じゃあ、BoxWithConstraints は Layout と同じじゃない? と思われますが BoxWithConstraints には contentの新しいSubcompositionを組み立て初回コンポジションを layout ステップまで延長できます。
例えば画面サイズによって違うUI コンポーネントを作ることができます。
BoxWithConstraints {
    if (maxWidth > 450.dp) {
        TabletUi()
    } else {
        PhoneUi()
    }
}
もっと詳しく知りたいなら、Jorge Castillo氏の記事で BoxWithConstraints 以外も色々紹介してくれてるのでぜひ読んでみてください。
LazyLayout
LazyRow、LazyColumn や LazyGrid みたいなビューを Lazy 初期化やビューの再利用の仕組みを使用するコンポーネントは全て内部的に SubcomposeLayout を利用してる LazyLayout です。
@Composable
fun LazyLayout(..) {
    ..

    SubcomposeLayout(
        modifier,
        ..
        { constraints ->
            itemContentFactory.onBeforeMeasure(this, constraints)

            with(LazyLayoutMeasureScopeImpl(itemContentFactory, this)) {
                measurePolicy(constraints)
            }
        }
    )
}
LazyLayoutは、アイテムが表示された場合は、SubcomposeLayoutを使ってアイテムのSubcomposition を初期化します。アイテムが非表示になる場合は、利用されてない Subcomposition を削除ます。subcomposeメソッドに渡せるslotIdパラメータを使ってこの複数の Subcomposition を管理してます。internal class LazyLayoutMeasureScopeImpl internal constructor(..) { .. override fun measure(index: Int, constraints: Constraints): Array<Placeable> { .. val key = itemContentFactory.itemProvider().getKey(index) val measurables = subcompose(slotId = key, content = ..) .. } }LazyRowやLazyColumnの場合は、このslotIdは渡せるkey(デフォルトはDefaultLazyKey) パラメータですね。LazyRow { items(list, key = { item -> /* item.id */ }) { item -> Box(..) } }slotId を使って
SubcomposeLayoutは必要な Subcomposition の Recomposition を実行すしたり、利用されてない slotId の Subcomposition を外せます。SubcomposeLayoutにSubcomposeSlotReusePolicyパラメータを渡すと現在使用されていない複数のSubcomposition を廃棄する代わりに保持し再利用することの仕様を定義できます。LazyLayoutにもLazyLayoutItemReusePolicyが定義され、private const val MaxItemsToRetainForReuse = 7の Subcomposition を保持する仕様になってます。@ExperimentalFoundationApi private class LazyLayoutItemReusePolicy(..) : SubcomposeSlotReusePolicy { private val countPerType = mutableMapOf<Any?, Int>() override fun getSlotsToRetain(slotIds: SubcomposeSlotReusePolicy.SlotIdsSet) { .. val currentCount = countPerType[type] ?: 0 if (currentCount == MaxItemsToRetainForReuse) { remove() } else { countPerType[type] = currentCount + 1 } } }Scaffold
Scaffoldは Material Design ガイドラインの画面構造に従ったテンプレートを用意してるUIコンポーネントです。
@Composable
fun Scaffold(
    modifier: Modifier = Modifier,
    topBar: @Composable () -> Unit = {},
    bottomBar: @Composable () -> Unit = {},
    floatingActionButton: @Composable () -> Unit = {},
    ..
    content: @Composable (PaddingValues) -> Unit
)
FAB、Toolbar などメインコンテンツ content 以外のUIコンポーネントを考慮して content に PaddingValues を渡せるため Scaffold も内部的に SubcomposeLayout を使ってます。
SubcomposeLayout { constraints ->
    val layoutWidth = constraints.maxWidth
    val layoutHeight = constraints.maxHeight

    val looseConstraints = constraints.copy(minWidth = 0, minHeight = 0)

    layout(layoutWidth, layoutHeight) {
        val topBarPlaceables = subcompose(ScaffoldLayoutContent.TopBar, topBar).fastMap {
        }

        val topBarHeight = topBarPlaceables.fastMaxBy { it.height }?.height ?: 0

        ..

        val bottomBarPlaceables = subcompose(ScaffoldLayoutContent.BottomBar) { bottomBar.. }

        val bottomBarHeight = bottomBarPlaceables.fastMaxBy { it.height }?.height ?: 0

        val bodyContentHeight = layoutHeight - topBarHeight

        val bodyContentPlaceables = subcompose(ScaffoldLayoutContent.MainContent) {
            val innerPadding = PaddingValues(bottom = bottomBarHeight.toDp())
            content(innerPadding)
        }
        ..
    }
}
kotlinlang Slack では「1つ Activity に1つ Scaffold を使うと(特に Navigation Graph が大きくなる場合)Toolbar の管理コストが発生ししてまうから、Navigation graph の画面個別で Scaffold 使えばどうでしょう」という質問がありました。
Android UI Toolkit チームの Ian Lake氏は「Scaffold は SubcomposeLayout を使ってるからパフォーマンスコストが発生するから複数の SubcomposeLayout を避けましょう」のように回答しました。
終わりに
SubcomposeLayoutはパフォーマンスに影響します。
- layout ステップに新しい Composition を組み立てコンポジションの実行、組み立てる Composition の管理のためパフォーマンスコストがあります。
- Compose はレンダリングを最適化するため layout ステップで必要な最小限の処理が行うことを期待します。
なので、SubcomposeLayoutを使う前に他のコンポーネントを使ってユースケースの実装が可能かを調べた方が良いと思います。